Implementing advanced data loss prevention (DLP) strategies in Microsoft Purview
Table of contents
Organizations worldwide reported an increase in data breaches, and in many cases, these were caused by internal data exfiltration by employees. Often, the exfiltration is not malicious but accidental, as users may not be aware of the sensitive information they are sharing.
Consider a 50-page document that contains information an employee needs to share with an external partner. If they are not intimately familiar with the document, they may not know about the government identification numbers on page 34 or the two bank account numbers on page 22. Or perhaps they are very much aware of this information, and their goal is to provide it to others.
This is where Data Loss Prevention (DLP) becomes an important component of your data protection infrastructure. Whether the intent is accidental or malicious, Purview’s DLP features can detect, notify, and, if necessary, block the exfiltration of that data.
Consider the basics of DLP
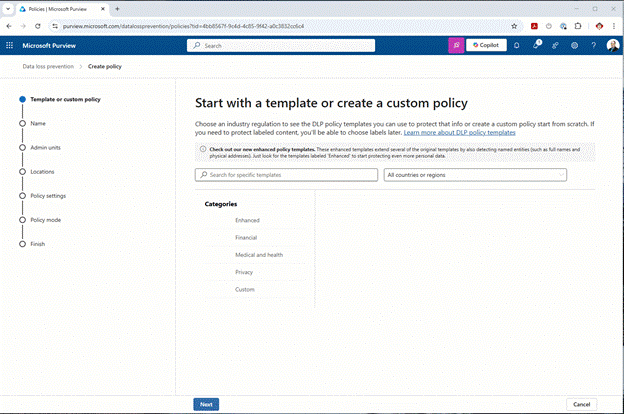
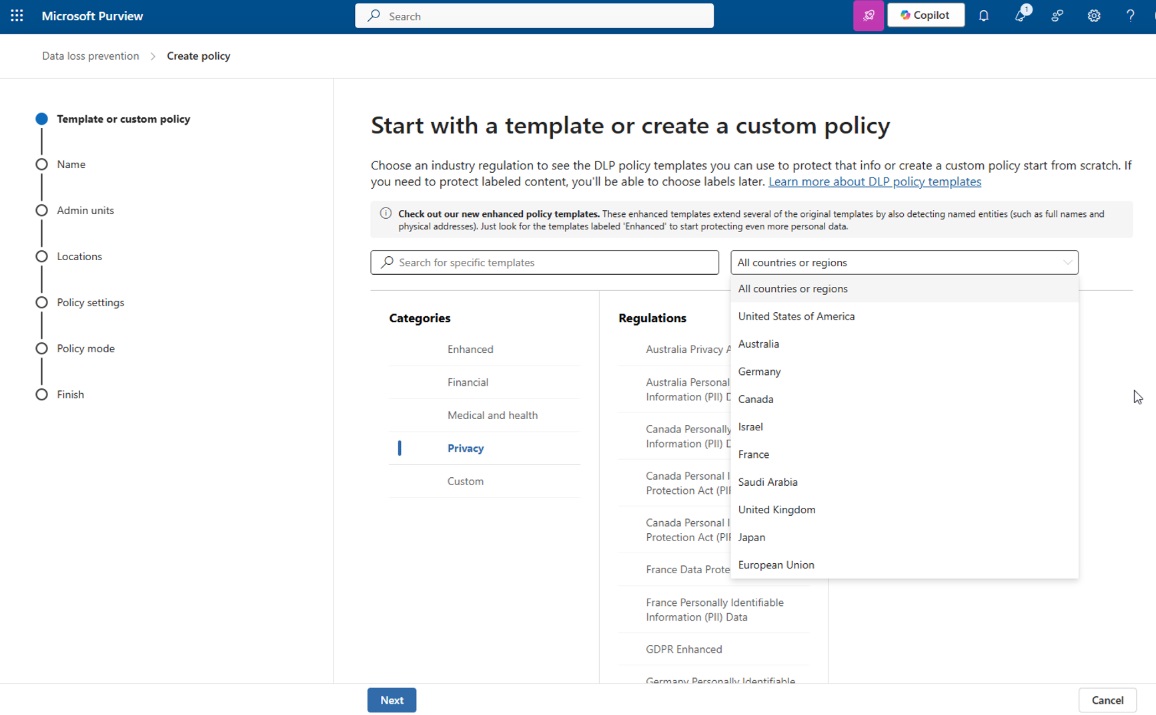
Before jumping into some of the more robust and versatile options available with DLP, consider the out-of-the-box (OOTB) options that Purview provides. Microsoft has configured a very large number of templates that you can use. As you will see in the following illustration, there are several categories and many templates to choose from:
Administrators can even determine OOTB templates for their company’s geolocation. This is especially helpful if you only focus on sensitive information for your geolocation.
Starting with these OOTB templates will allow you to better understand some of the sensitive information contained within your workloads (SharePoint, OneDrive, etc.) and provide a starting point for determining just how much control or scrutiny you need to enable within your organization.
Remember, these are generic templates. They are looking for specific types of information and allow you to report or block sharing that information. However, starting with the OOTB templates can assist administrators in placing some basic controls, and the end-users learn about the sensitive information they need to help your organization protect.
Building custom DLP policies: Getting more advanced to meet your needs
Now that you have created some OOTB policies that allowed the security team (and end users) to understand the basics of Microsoft Purview’s DLP solution, you can start building on that knowledge and creating advanced, custom DLP policies in Microsoft 365. However, you should answer a few questions before digging into these policies.
- What information are you trying to protect?
- Where do you want to protect the information (SharePoint, Exchange, OneDrive, Endpoints, etc.)?
- Do you want to protect information shared within the organization, information shared outside the organization, or both?
- Do you want to block them from sharing, provide tips to help them identify when they are sharing items they should consider more, provide reports to security Analysts, or do some combination of all three?
Answering these questions will assist in building out the policies that will meet your organization’s needs.
Targeting sensitive information important to your organization
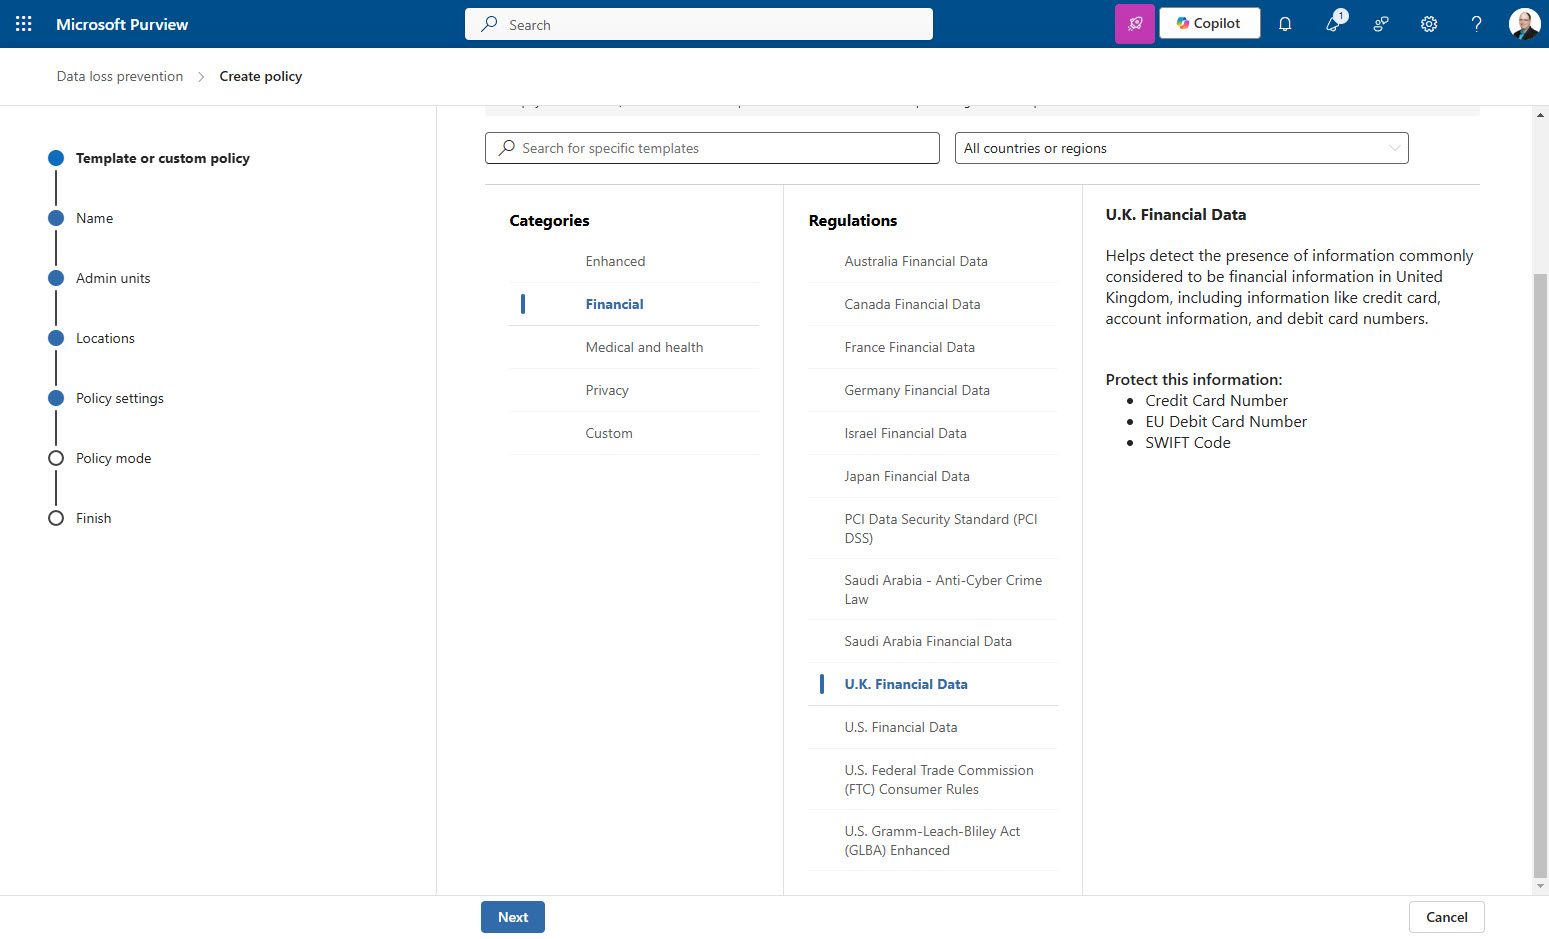
If you created DLP policies using the Microsoft-provided templates, you’ll notice that the templates cover the common sensitive information types or SITs. For example, looking at the various financial templates they cover your standard economic SITs such as bank account numbers, credit cards, ABA routing (U.S.), SWIFT (international), etc., as seen in the following screenshots:
U.S. Financial SITs

U.K. Financial SITs
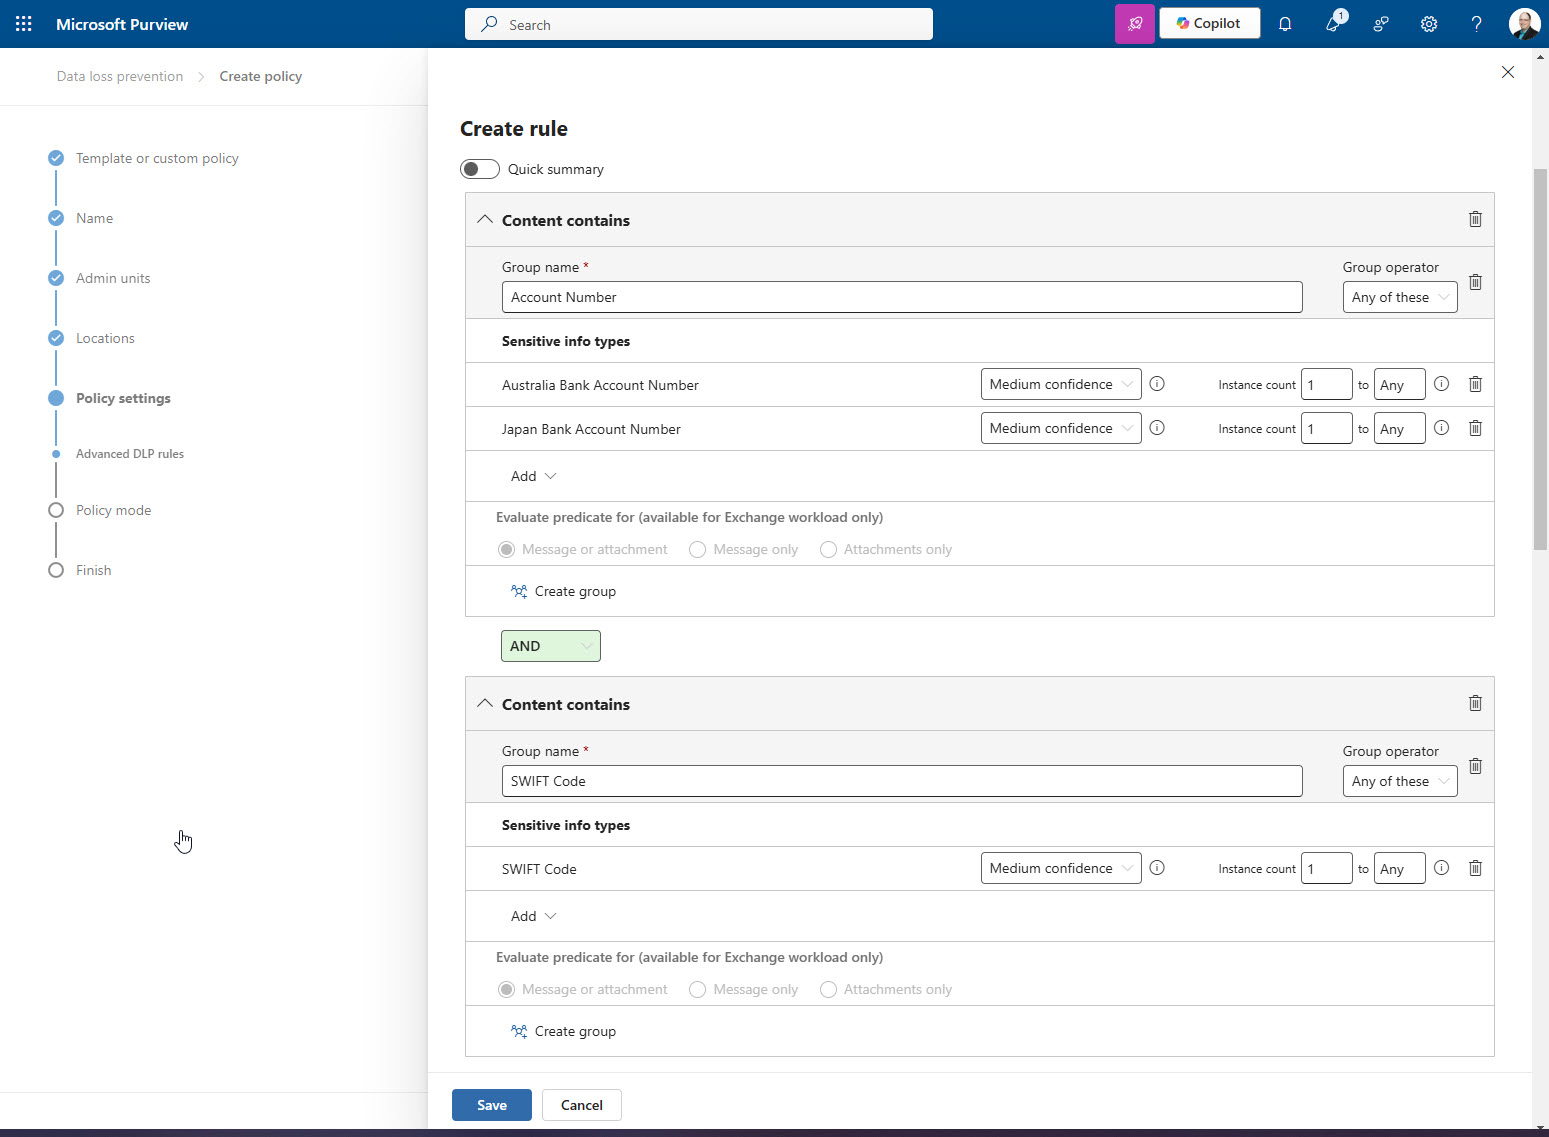
This means that if the DLP finds a credit card, EU debit card, or SWIFT code, the DLP policy will fire. However, perhaps to your organization, a SWIFT code isn’t terribly important by itself, but paired with an account number, it can become very concerning indeed.
You may wish to target content that contains both a detected account number AND a SWIFT code in the same document. To your business, this is sensitive information you need to manage, so understanding the targeted data is essential. The OOTB templates may not meet your needs.
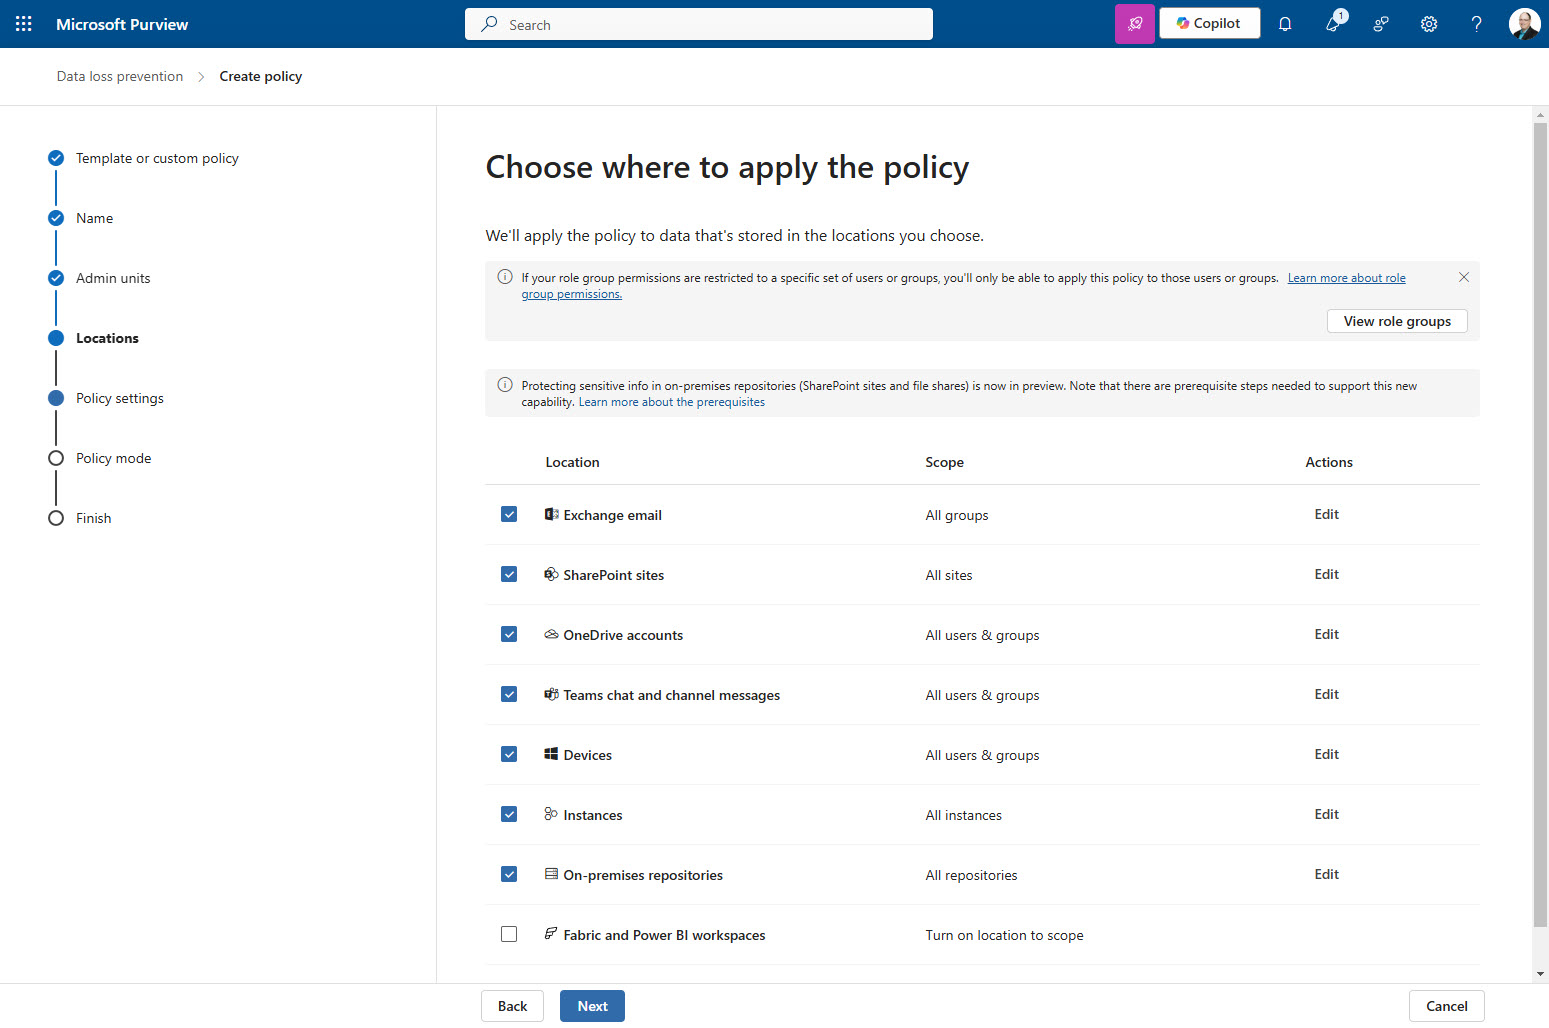
DLP policies’ location is important
When you build a custom DLP policy, the location you select from the list of available options is important. First off, there’s a lot to choose from:
Targeting too many locations can make that particular policy very “noisy” in that there will be more chances of it firing. This is not a bad thing, but it can make it difficult to identify the problem areas if you have to wade through many alerts for the same policy. A recommendation I have is to be very focused on the target locations when I create DLP policies. For example, I feel creating similar policies for different workloads is a good idea.
Create a policy for Exchange Only that targets account numbers and SWIFT codes.
Create another policy that does the same thing but for SharePoint sharing. Yes, it creates additional policies within your tenant, but it helps to identify locations of concern without having to dig deep into the locations where the alerts are occurring. You can see where your alerts are happening at the summary level.
A second, very important reason for targeted locations has to do with the conditions that will trigger an alert. Different locations have different triggers.
For example, you can trigger alerts based on the content found within the document or an alert based on the recipient of the sharing activity. A key factor in DLP policies that is not well-known or publicized is that a DLP policy will only allow triggers that exist across all locations selected. This means if you want a trigger that deals with addresses in an email’s “CC” line and you add SharePoint as a location, that option will never show up because a similar activity does not exist in SharePoint sharing.
To demonstrate, let’s look at the activities for policies that target Exchange:
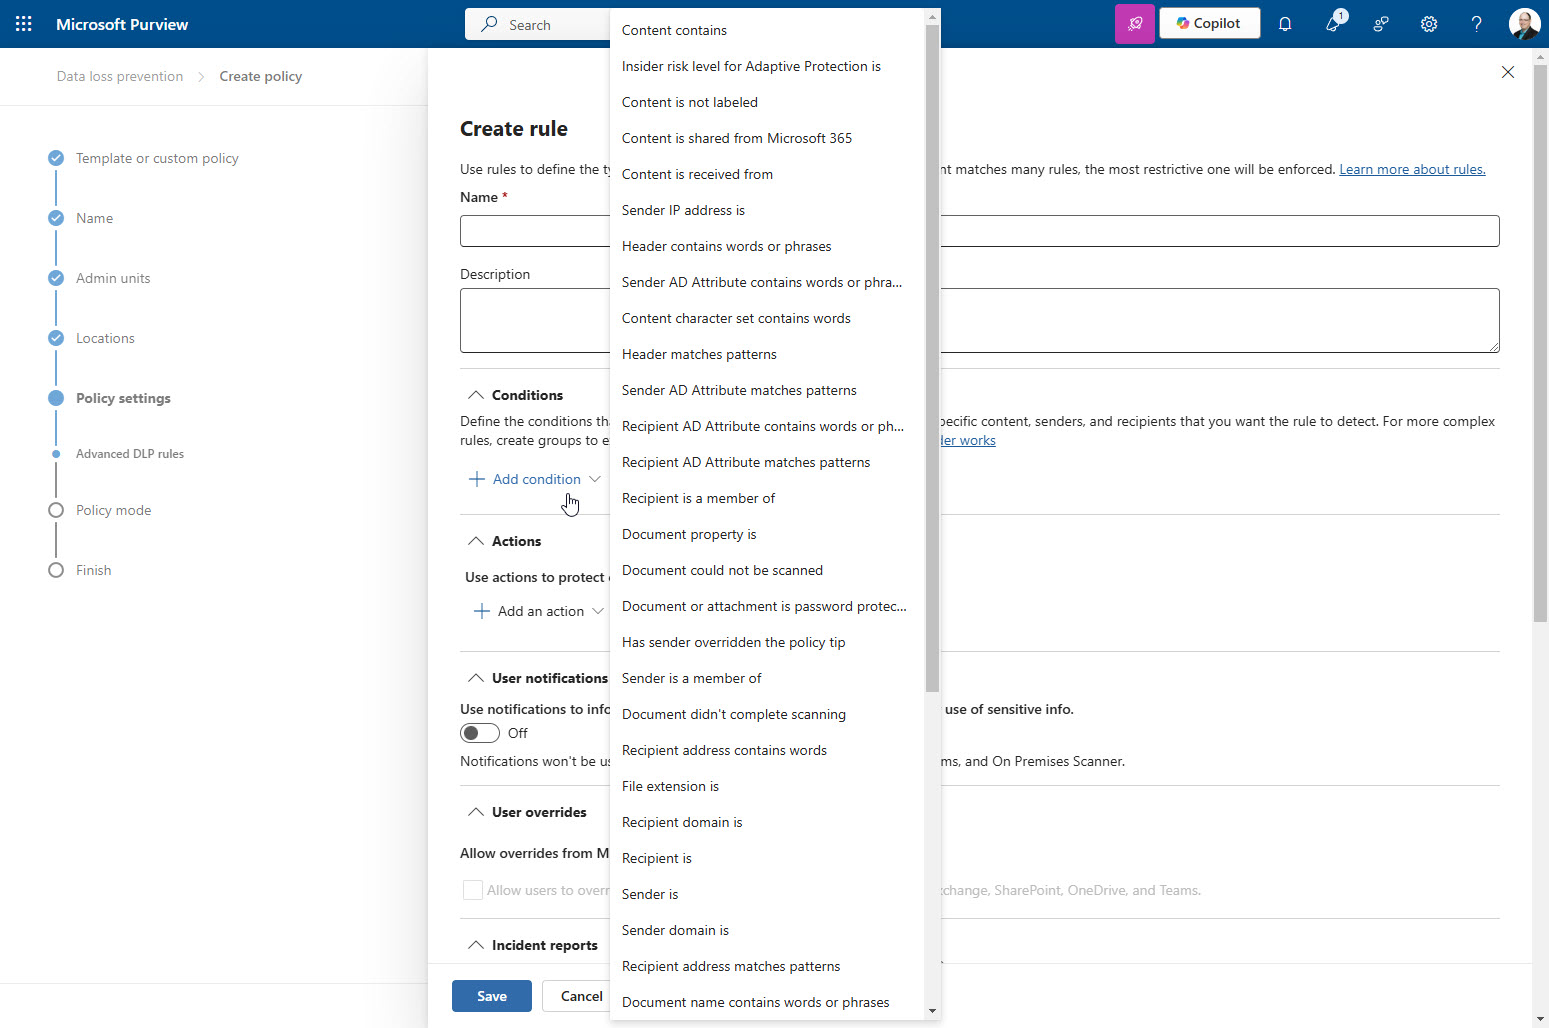
That’s a lot of options. Now let’s add SharePoint sites:
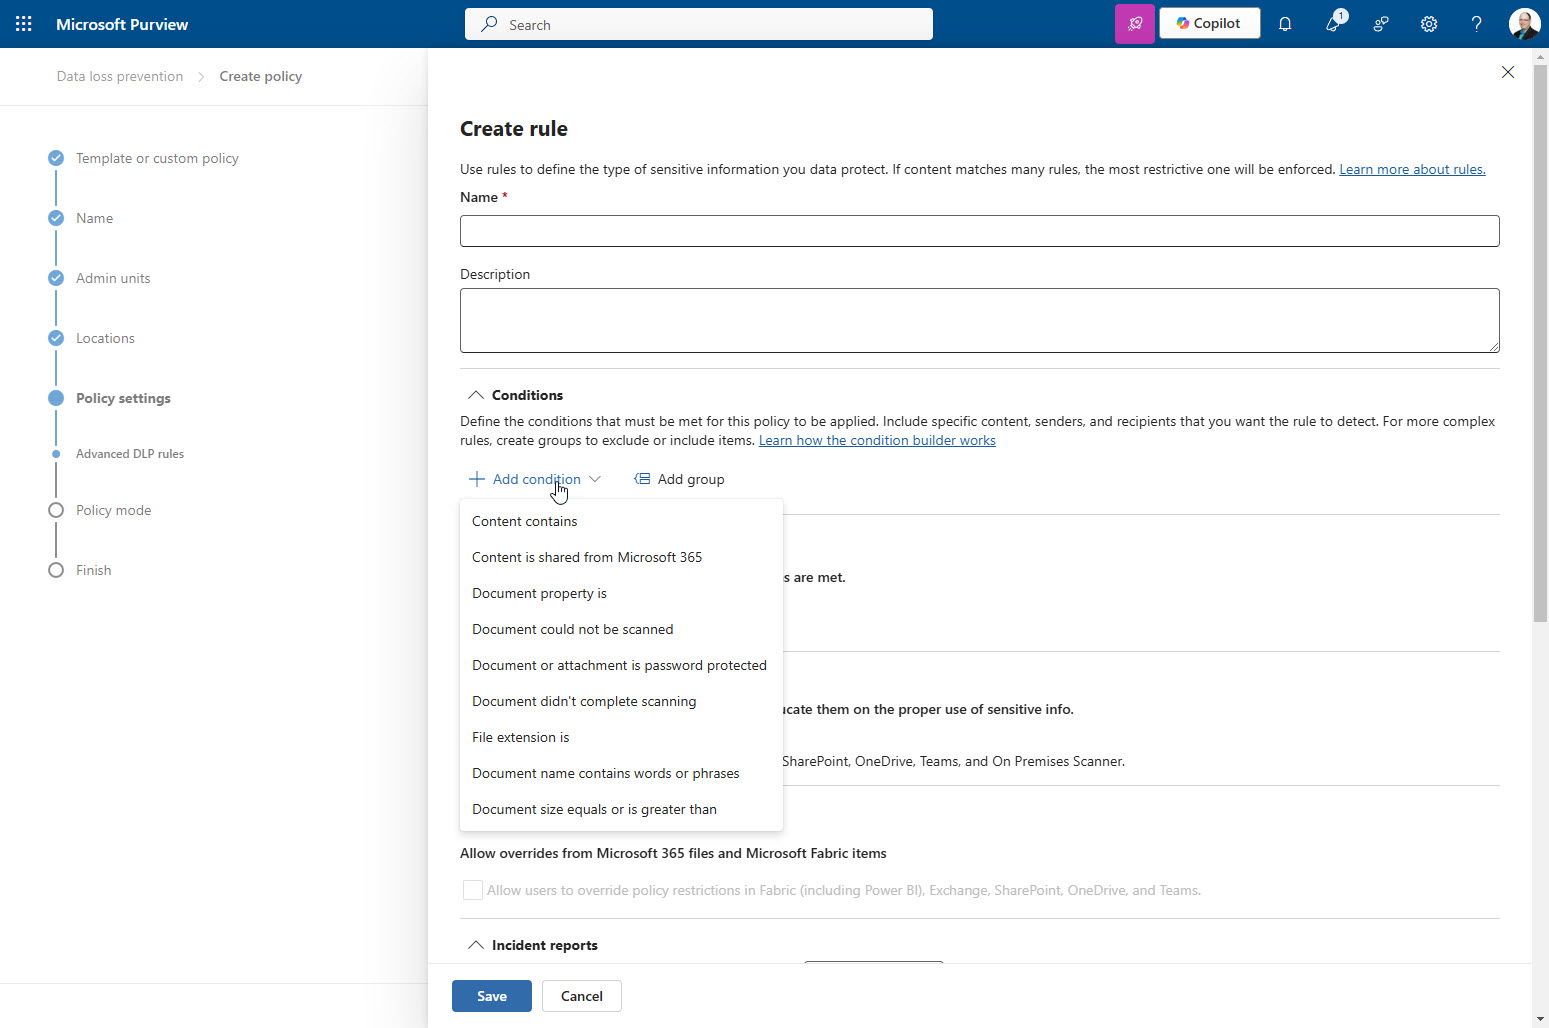
There are a lot fewer to select from. This is because these nine (9) activities are the only ones that exist in both SharePoint and Exchange.
Many of you may feel that this will meet your needs, and often it does. But the problem is that if, at some point down the road, you need to modify your rule because of a discovered hole in your security, you may be limited by this policy because you combined locations. Options you need to fine-tune the policy may not be available. This is why I highly recommend separating key locations in your DLP policies. This reason is even more compelling than the “Alert noise” I discussed above.
DLP policy: Sharing internally vs. externally
Believe it or not, a DLP policy isn’t just for sharing content externally; it is also meant for targeting internally shared content. Consider the following: you have a specific team handling highly sensitive strategic information in a SharePoint site that only a few can access.
You would likely want to be aware if someone starts sharing that information with the new temporary employee who was just hired a week ago, right? Yes, I thought so. Monitoring the internal sharing of content can sometimes be as important as sharing the content with external contacts.
DLP policies do allow you to create rules that monitor the sharing of content internally and externally:
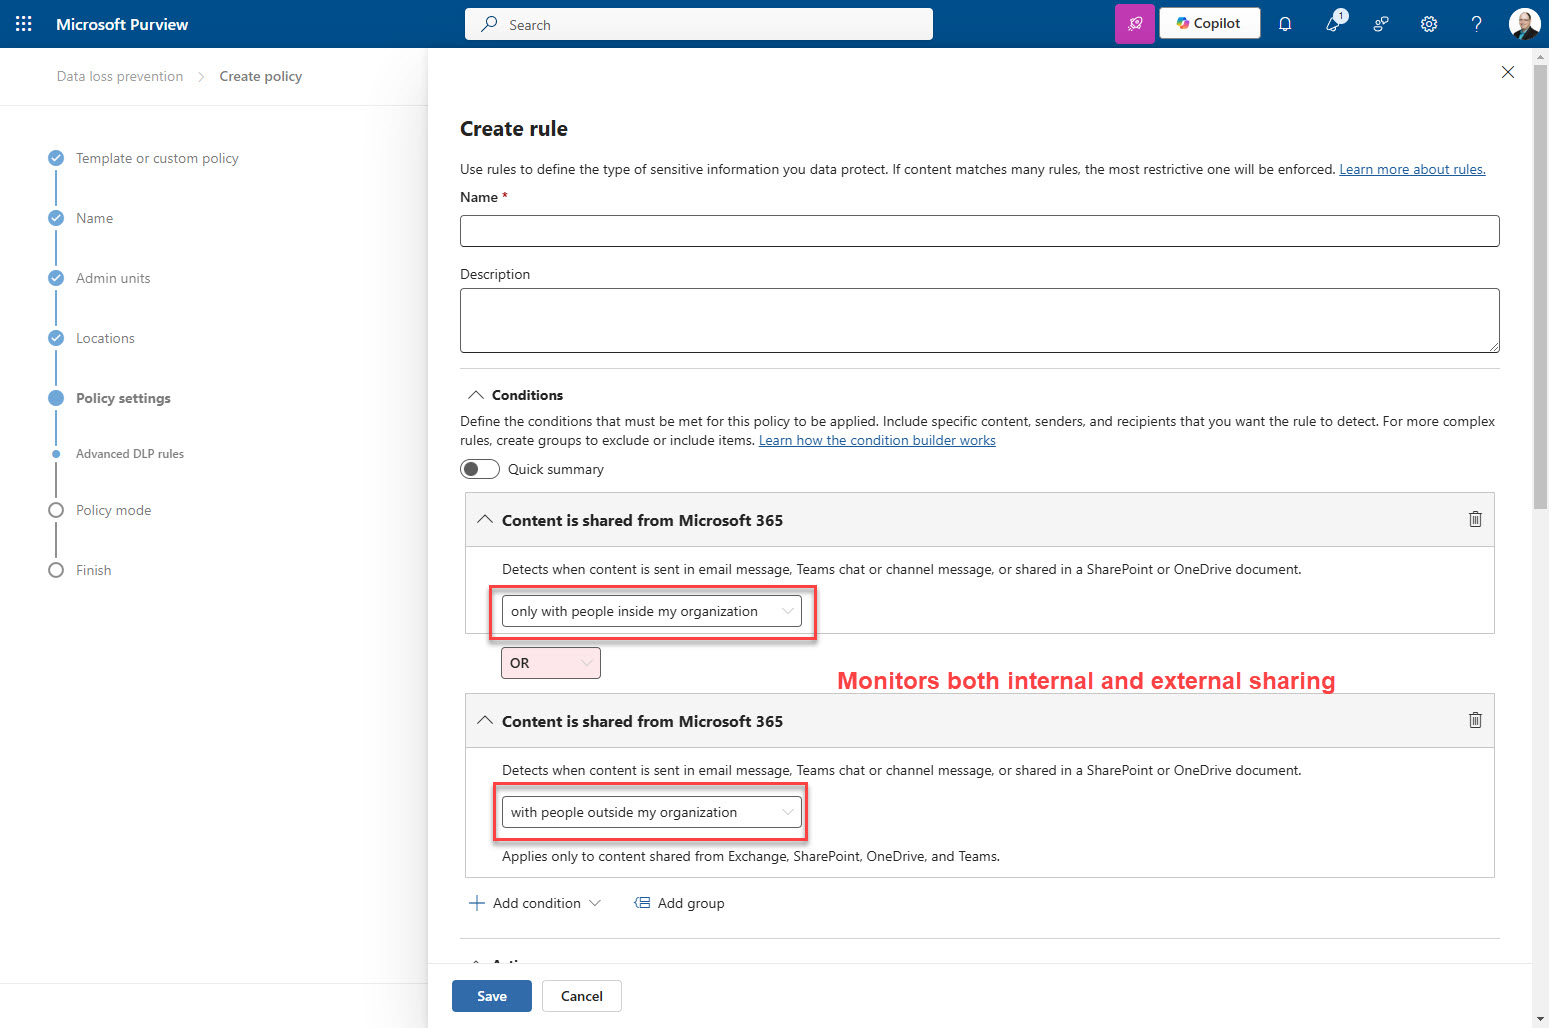
But like locations, I recommend that this be separated by different policies or at least by different rules within a DLP policy (you can have multiple rules in a single DLP policy). This will allow for easier administration and control of modifications to a DLP policy should they be warranted.
Preventing sensitive data leaks: To block or not to block…That is the Question
Obviously, the goal of any security specialist is to stop the improper flow of sensitive information from their organization. But how do you want to accomplish this? DLP policies provide several ways to educate users or prevent them outright from sharing sensitive content when it shouldn’t be shared:
- Send an incident to Security Analysts to allow them to determine follow-up steps.
- Send a customizable notification to the user advising them that they shared something they may not have been authorized to do.
- Enable a pop-up called a policy tip to appear in Outlook or other Microsoft 365 workloads when sharing content that triggers the policy.
- Any combination of the above.
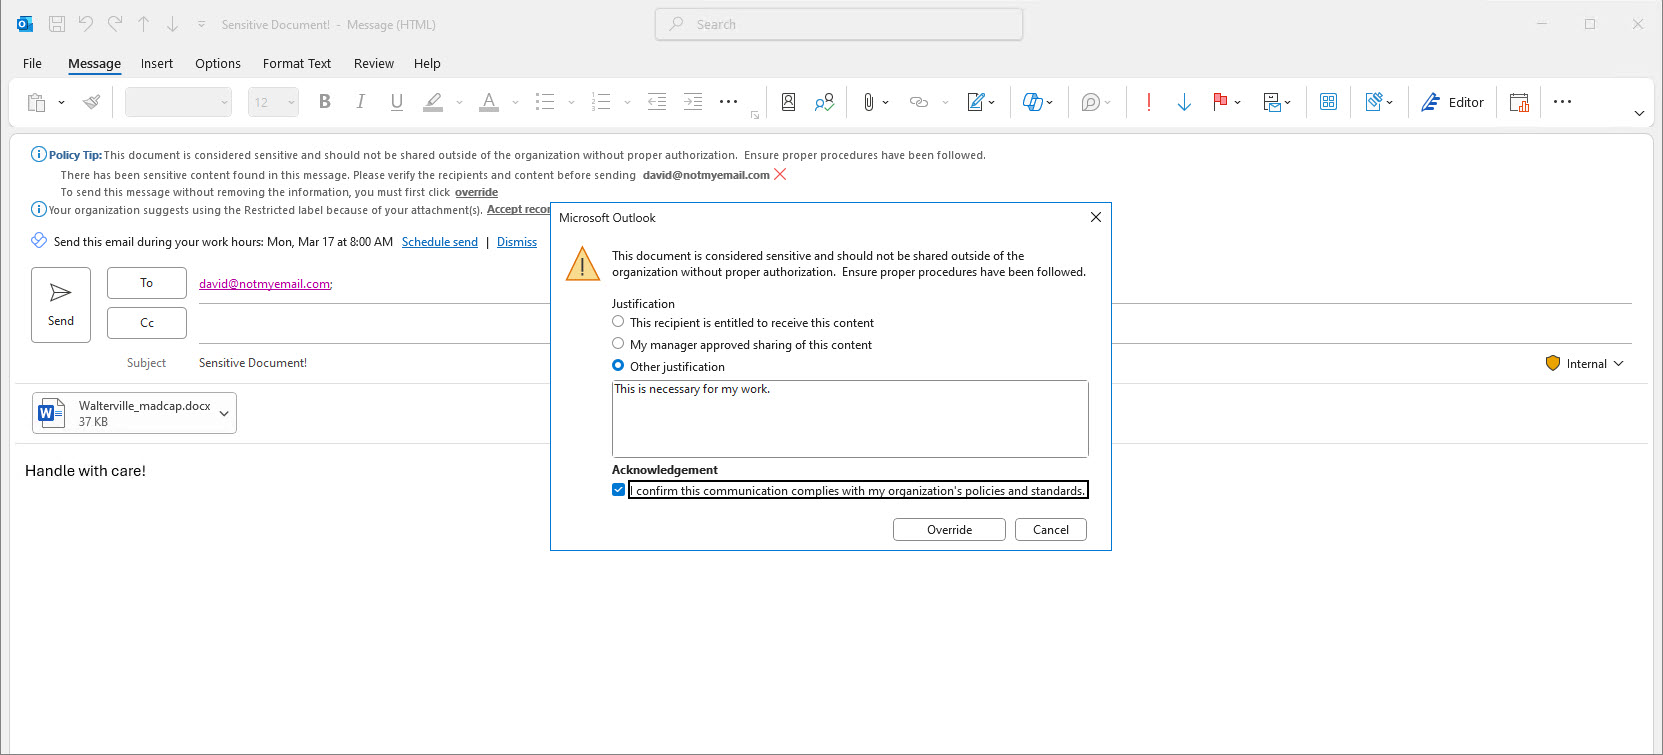
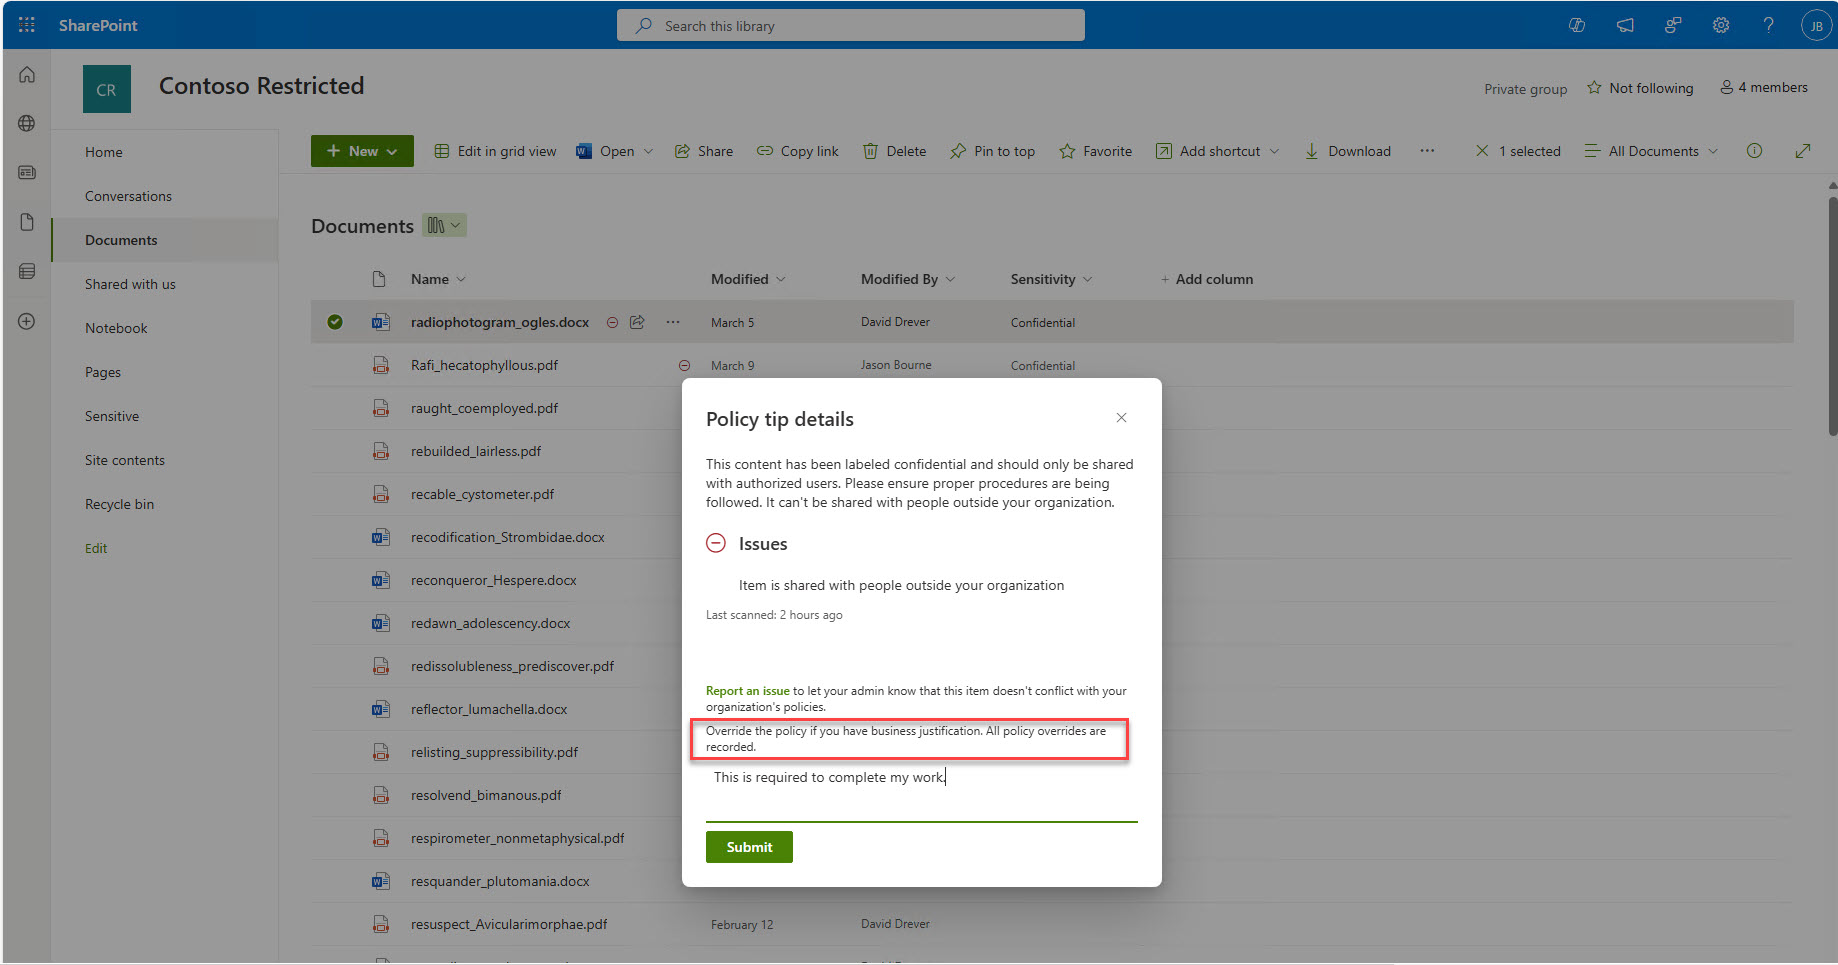
Additionally, you can block the attempt to share entirely. This step must be carefully considered because it may prevent a user from completing a task they need to do. A strongly recommended method is to enable blocking but allow the user to override. The override can be configured to force the user to provide a reason for overturning the policy. This allows the administration team to learn how users share their content and determine if exceptions are necessary. This is because all steps in a DLP alert and the overrides are audited.
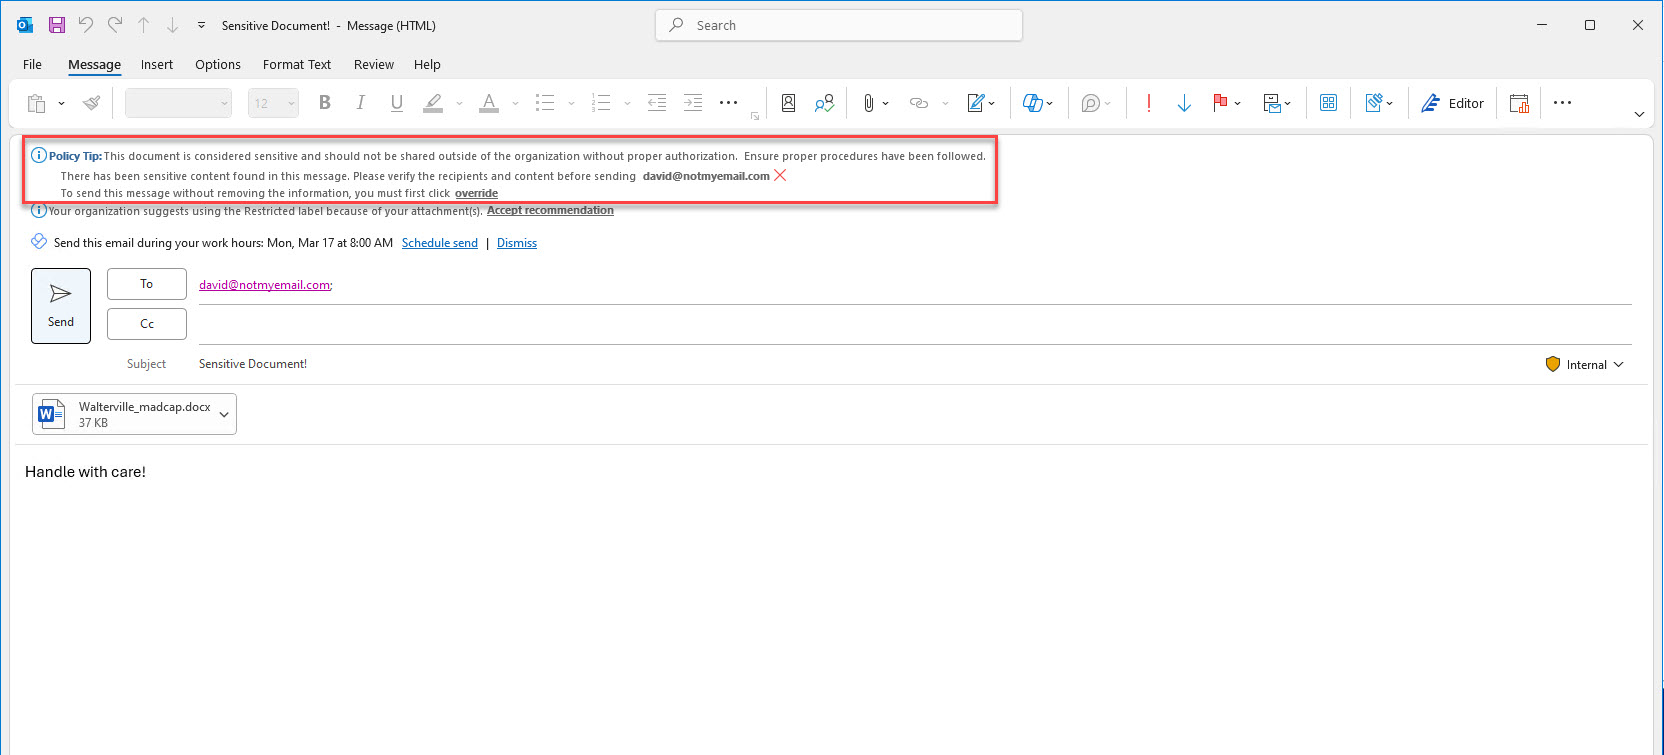
If a user shares a sensitive document and it triggers a DLP policy, they will see prompts similar to the following:
In Exchange:
In SharePoint:
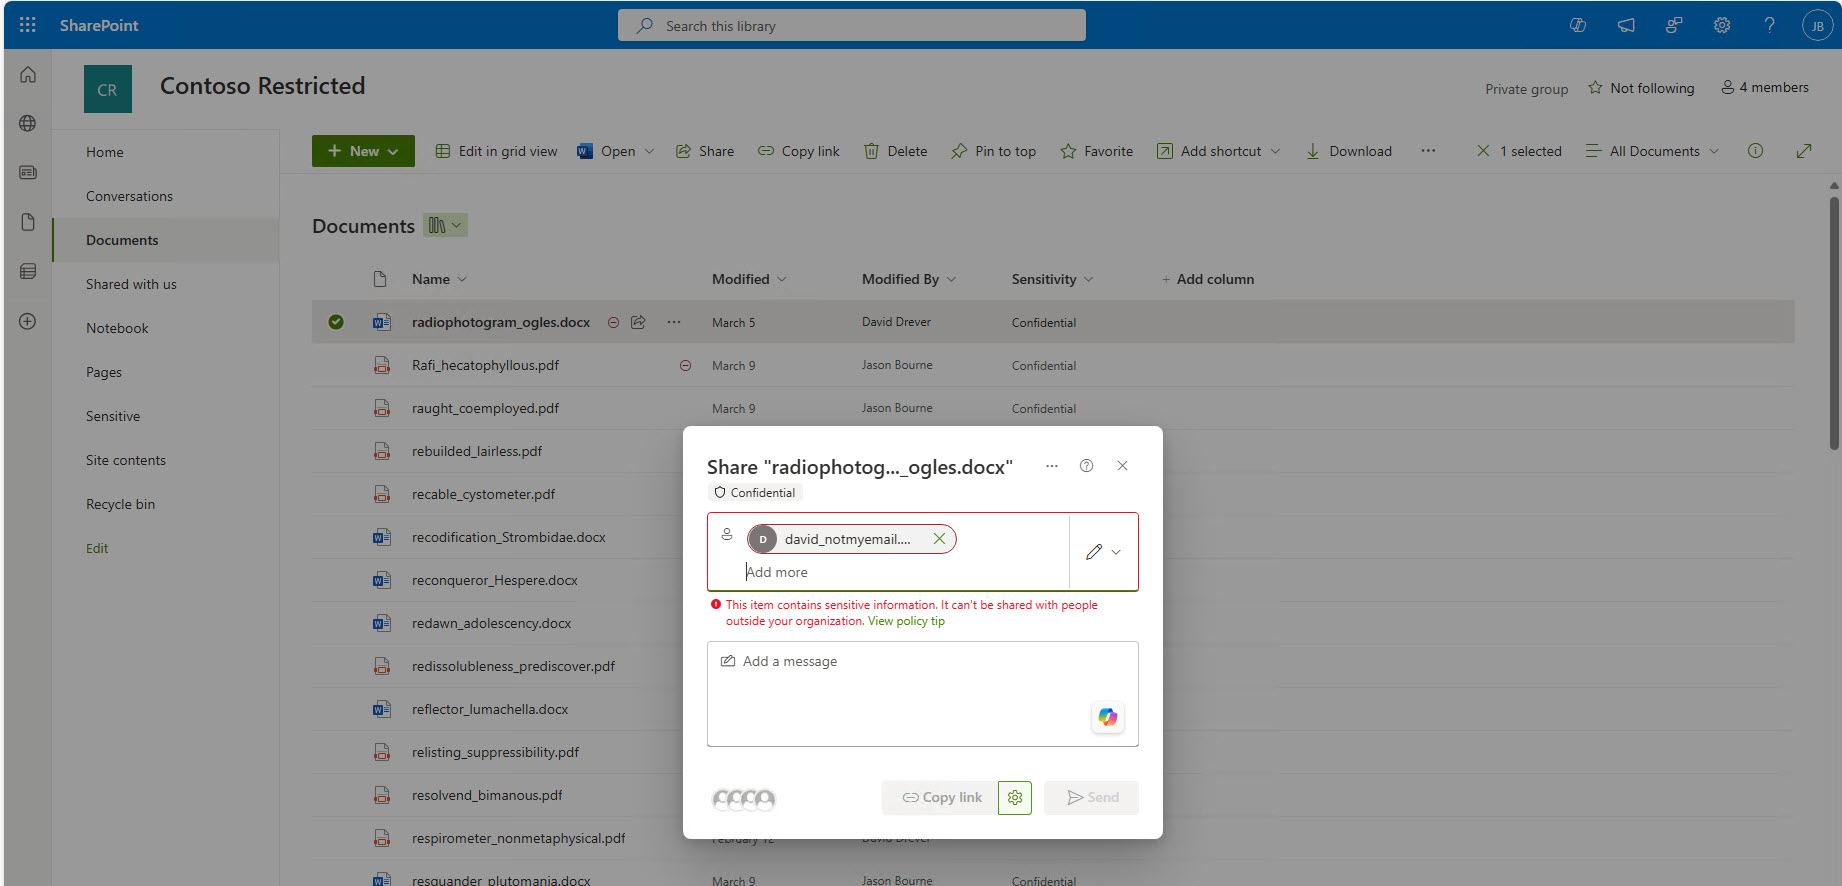
The prompts can allow users to override and continue:
In Exchange:
In SharePoint:
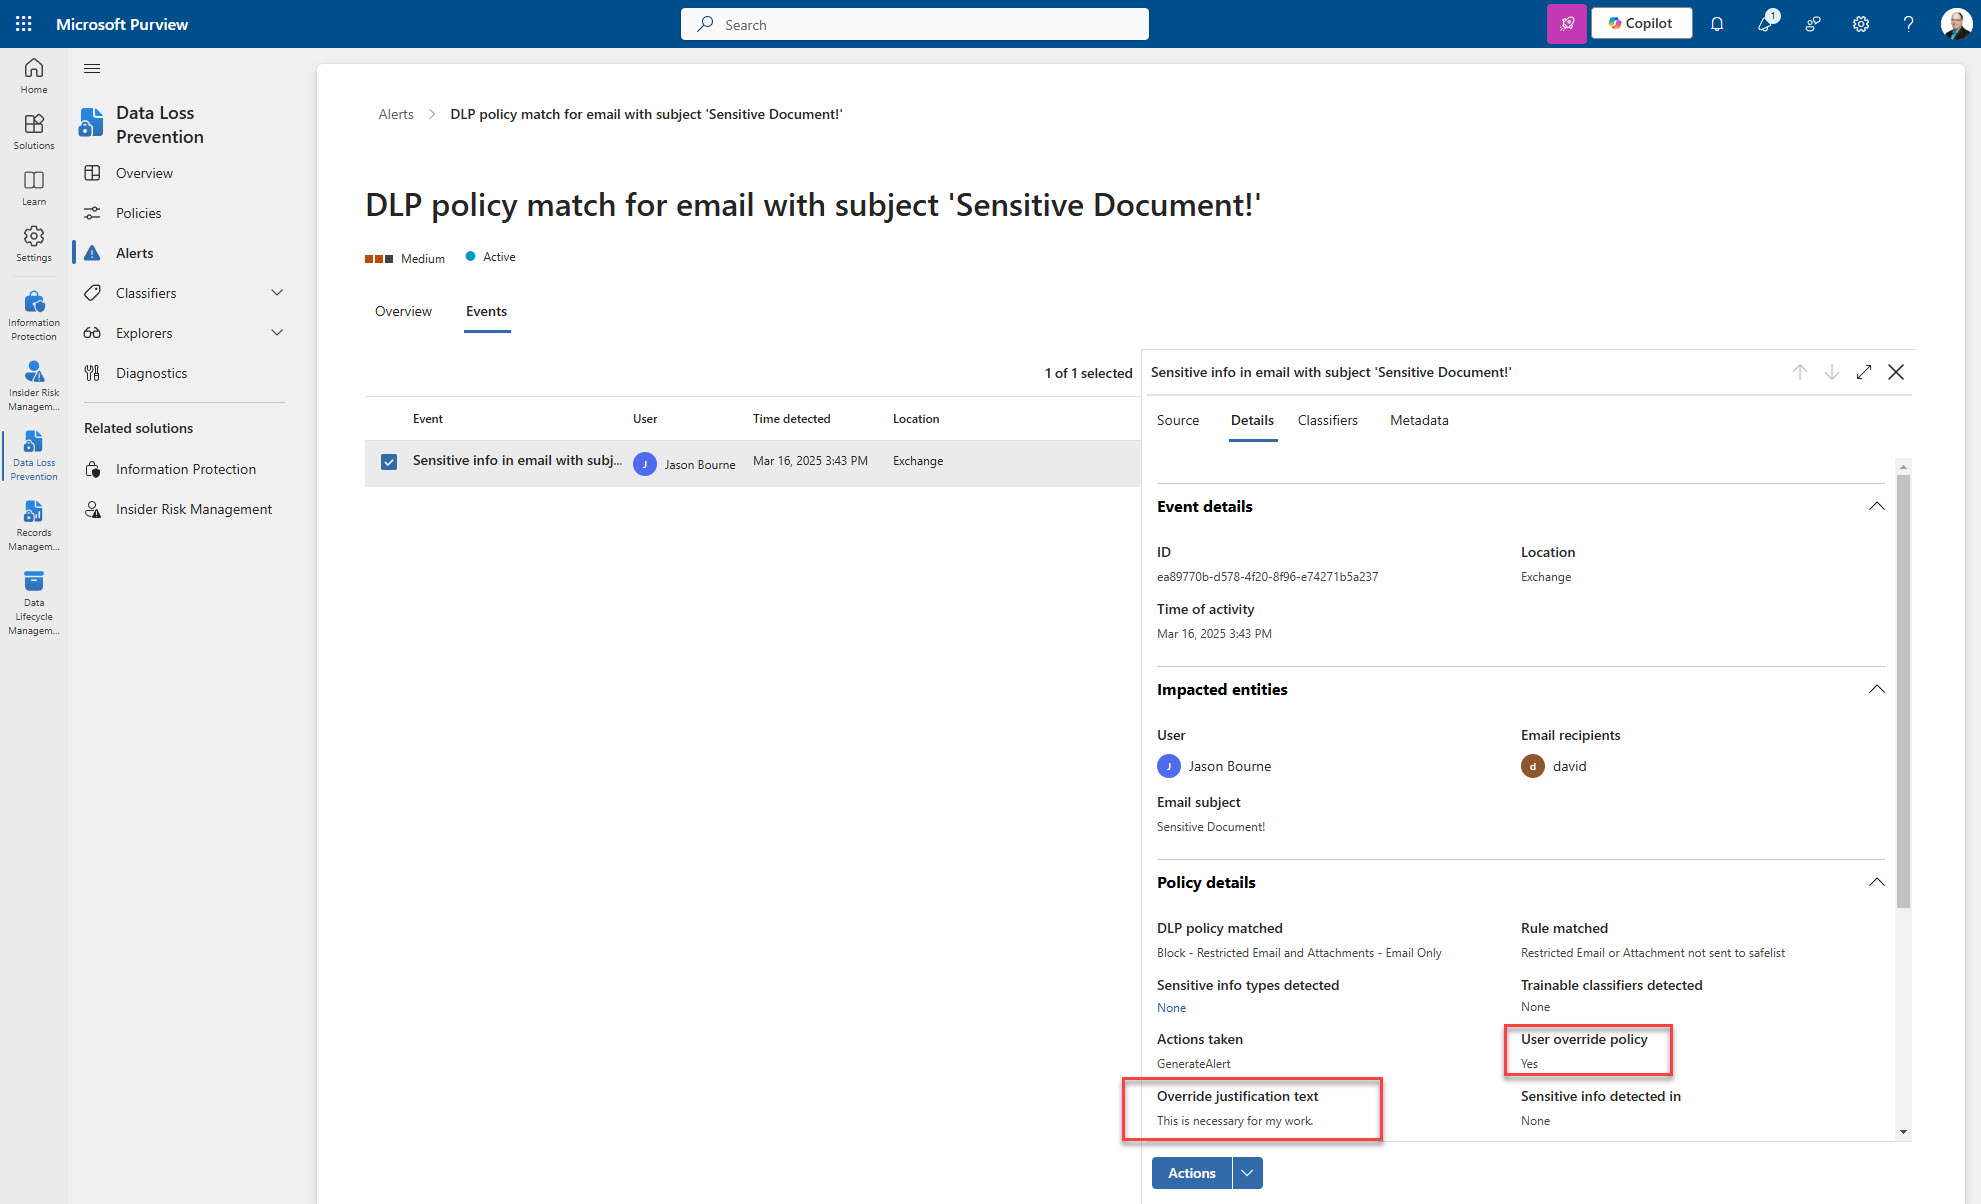
When a user overrides a DLP block, an alert is generated within Purview. Additionally, an audit of the user’s actions and justification is trapped, as seen in the following screenshot:
If you do not allow users to override, they will receive messages similar to the following and will be unable to send off the email:

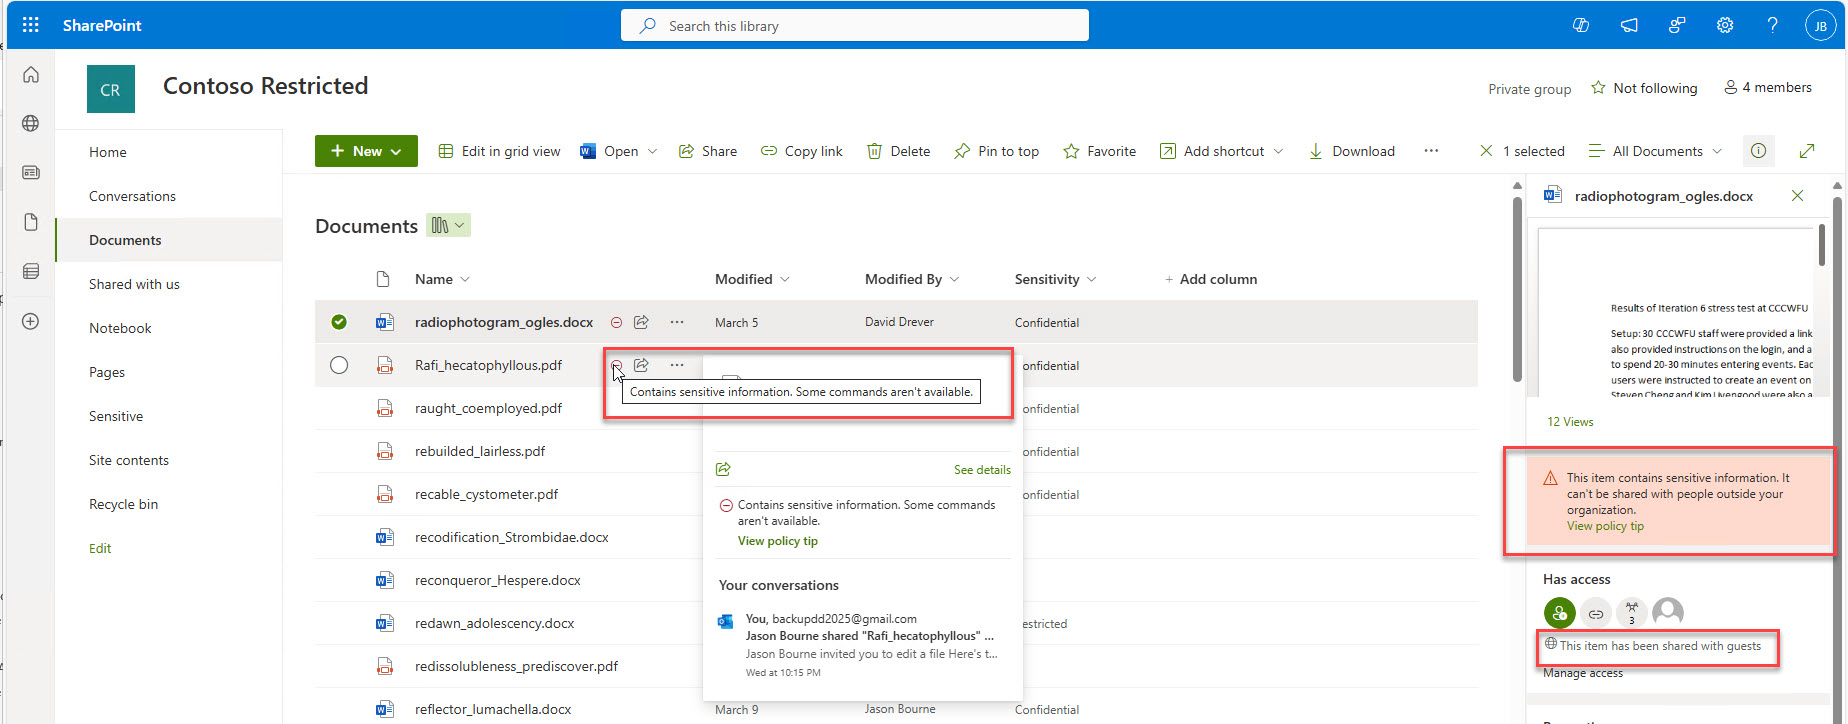
One final tip regarding DLP policies that will block is that Microsoft 365 storage locations will provide a tip to users if they know to look for it. It will be up to you to ensure they know what to look for. When a DLP policy determines a document has been shared without an override (the document was shared before the DLP policy was put in place), it will update the SharePoint interface with an indicator that the file does not meet security requirements.
Reviewing the document’s properties will provide additional information and an opportunity to override the DLP policy, thus removing the blockers.
Blocking activities in DLP policies: Take a phased approach
False positives can and will happen. It can be challenging to avoid false positives. There is so much information out there today that there is bound to be benign content that looks sensitive to the algorithms checking them. For this reason, avoiding blocking activities in DLP policies from the beginning is recommended. Give the security team a chance to fine-tune the policies to limit false positives as much as possible. The goal is to avoid irritating your users due to false positives, which can lead to distrust of the tools and difficult user adoption. A recommended approach to blocking content should be something similar to the following:
1. Begin Organizational Change Management processes for the organization before doing anything else.
The first thing you need to do when deploying a DLP policy that will block users from sharing content is to prepare them for it. They need to be notified and trained on what to do if they are blocked when they need to send content to complete their responsibilities.
There is a caveat to this. If you are creating it to catch malicious acts as they happen and confirm that a user (or users) is maliciously sharing sensitive information, you likely do not want to give them a warning beforehand, but in most cases, you want your users prepared.
2. Create the policy and place it in simulation mode with no alerts.
Taking this step first allows the security team to monitor and track sensitive information as the DLP policies fire, but there won’t be any intervention or alerts going to the end user. Security personnel can review the content to determine if the policy is properly trapping sensitive information or if modifications need to be made. Enabling without alerts will also stop SharePoint from putting up the indicators (as discussed above) on the library that content has been shared incorrectly.
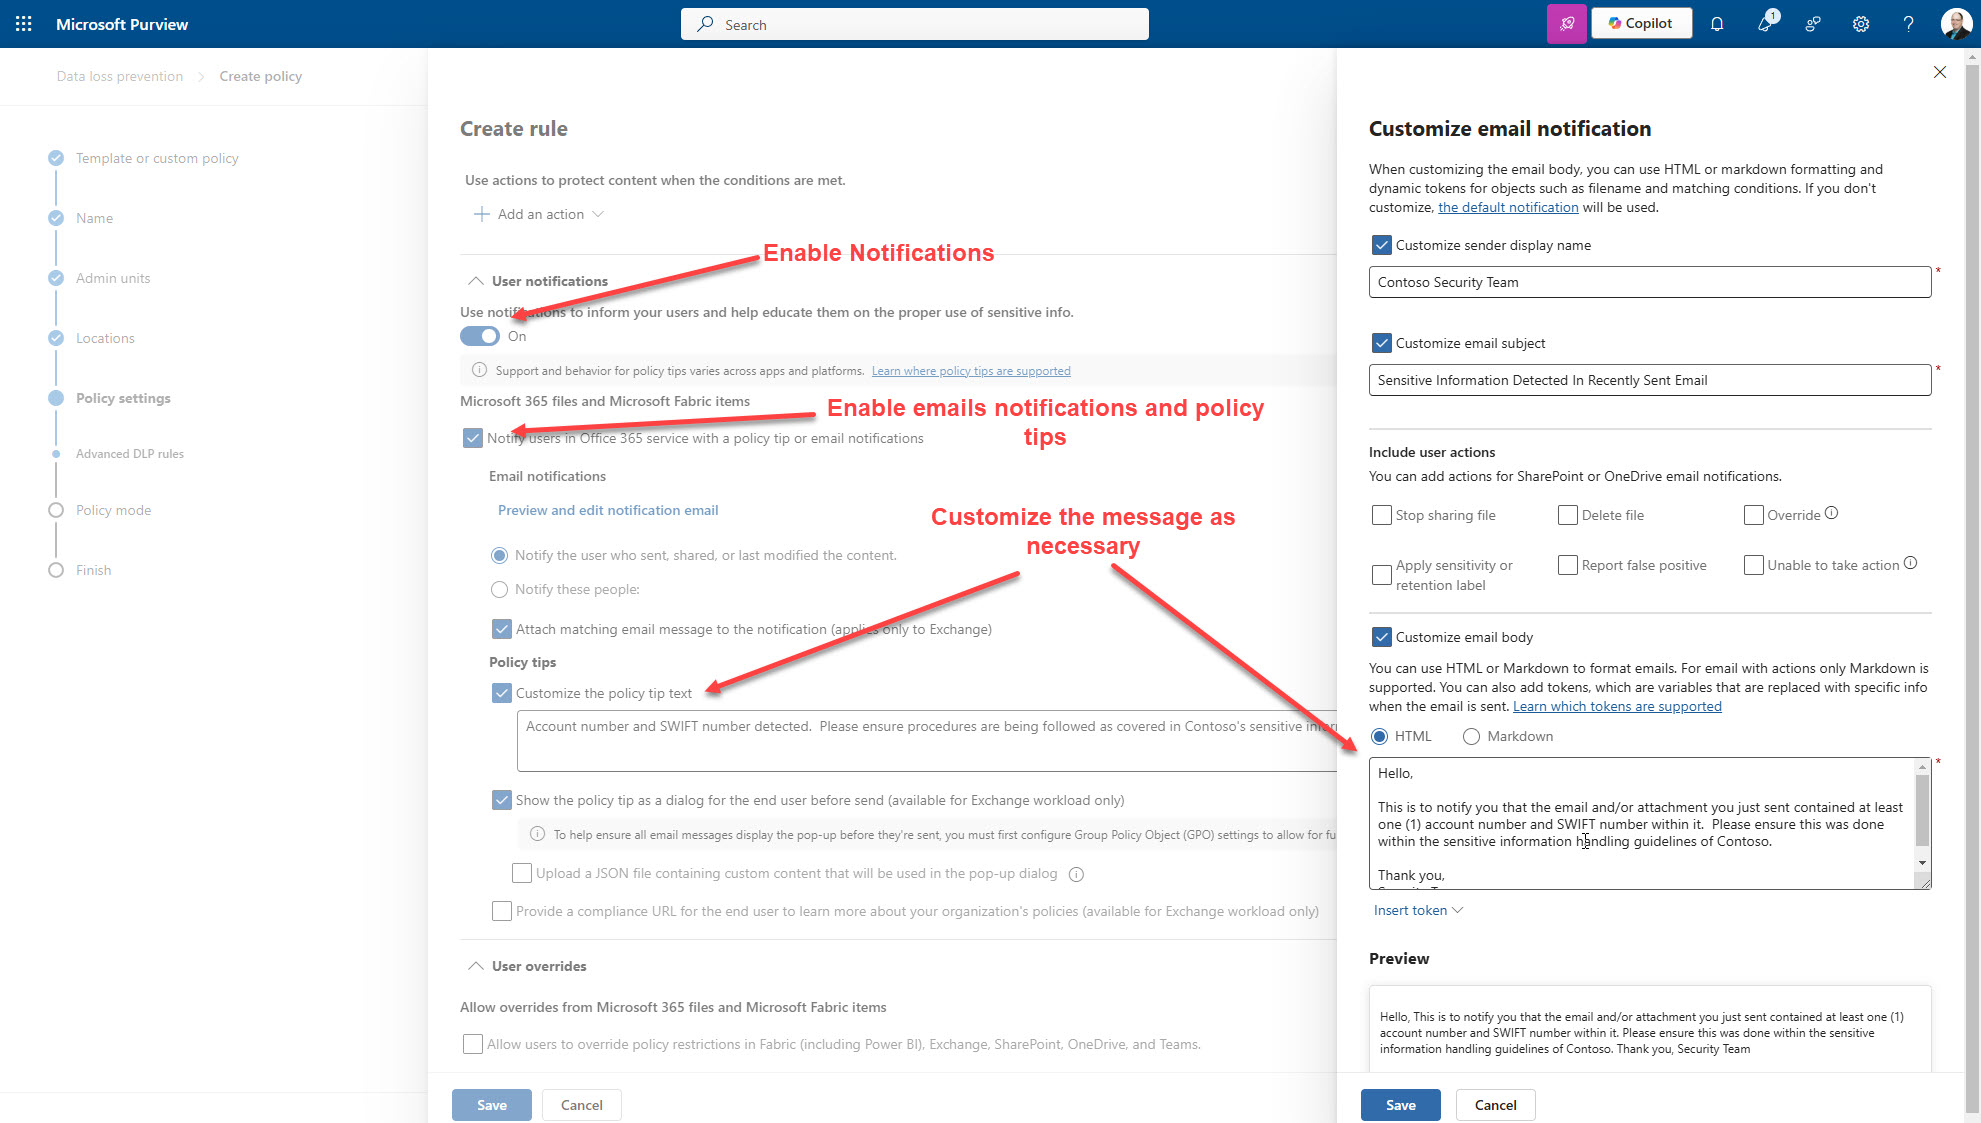
3. Place the policy in active mode, but do not block sharing immediately. Instead, use policy tips and email notifications within the policy to educate your users.
4. Finally, once users have had time to learn from the notifications, it is time to enable blocking.
Avoid blocking outright without a workaround unless there is a distinct need not to. There is almost always a business reason for sharing sensitive information, so providing an override is key to preventing the obstruction of legitimate collaboration.
Final thoughts on DLP policies
A DLP policy is essential to protecting your information. However, it will take careful planning to ensure the correct content is monitored, that users are prepared, and that you do not block users from completing their responsibilities. Do not enable everything from the start. DLP can be very intrusive to the end user. Give them and yourselves as administrators time to prepare for the proper use of DLP policies to ensure the best user adoption and usage of the tool.
Build a stronger foundation for Data Loss Prevention with Syskit Point
While Microsoft Purview provides powerful DLP capabilities for detecting and protecting sensitive information, many organizations struggle with the foundational challenge of visibility and access control across their Microsoft 365 environment.
Syskit Point complements and strengthens your DLP strategy by giving you complete visibility into external sharing, guest access, and permission vulnerabilities. With automated access reviews, risk dashboards, and workspace lifecycle management, Syskit Point ensures your environment is clean, compliant, and ready for advanced DLP enforcement, making it easier to protect sensitive data before problems arise.