Office 365 groups governance: 3 rules to keep your groups in order
Table of contents
Office 365 Groups are one of the most popular Microsoft tools. There are many places inside the Office 365 platform where you can click a “Create a Group” button. On top of that, anyone with the Office 365 license can create Office 365 Groups without restriction.
So it’s a wise idea to define some rules and a governance model. Here are our suggestions about what you should include in your Office 365 Groups governance.
1. Use creation criteria and manage Office 365 Groups self-service
For those who are planning an Office 365 strategy, this must be the central part of Office 365 Groups governance. Microsoft promotes the self-service creation of Sites, Groups, and Teams, which enables users to quickly begin using these tools. When you create a Team or a Group it will automatically create an associated SharePoint site, allowing you to head start with your collaboration.
But is this necessarily a good thing?
Some organizations cannot allow this freedom of creation. Why? Because creating large quantities of the content without a proper reason causes a sprawl in your tenant.
So what’s the solution? Should you shut down the self-service option?
The answer is a bit complex, and it depends on the size of your organization, its goals, and the number of users. If you work closely with just a couple of teammates, and you are aware of the work they are doing each day, you can trust them with the self-service option.
However, if you work in a large company with thousands of employees, it would be better to turn off the self-service button. You should set criteria that users must meet before they are given admin approval to create a Group. These criteria can be simple, such as having a unique and distinctive Group name, and a proper description of the Group that explains its function. Simple as those requirements might sound, they do a good job of showing SharePoint admins the reasoning behind the creation of a Group, and help them separate “wheat from chaff”.

2. Use Naming & Expiration policy for Office 365 Groups
We wrote about Naming and Expiration policies in our post that covered Office 365 Groups best practices. But repetition is the mother of learning, so we will go through it again.
A naming policy is a set of rules that you impose on your users in order to keep a consistent naming strategy. There are two rules:
- Prefix-Suffix naming policy: use prefixes or suffixes to define the naming convention of groups. They can be either fixed strings or user attributes that will be substituted based on the user who is creating the group.
- Custom Blocked Words: upload a set of words specific to your organization that would be blocked if a user were to try to use any of them in a Group name. Usually, these lists consist of profanities and terms that only specific users can use, such as “Payrolls”.
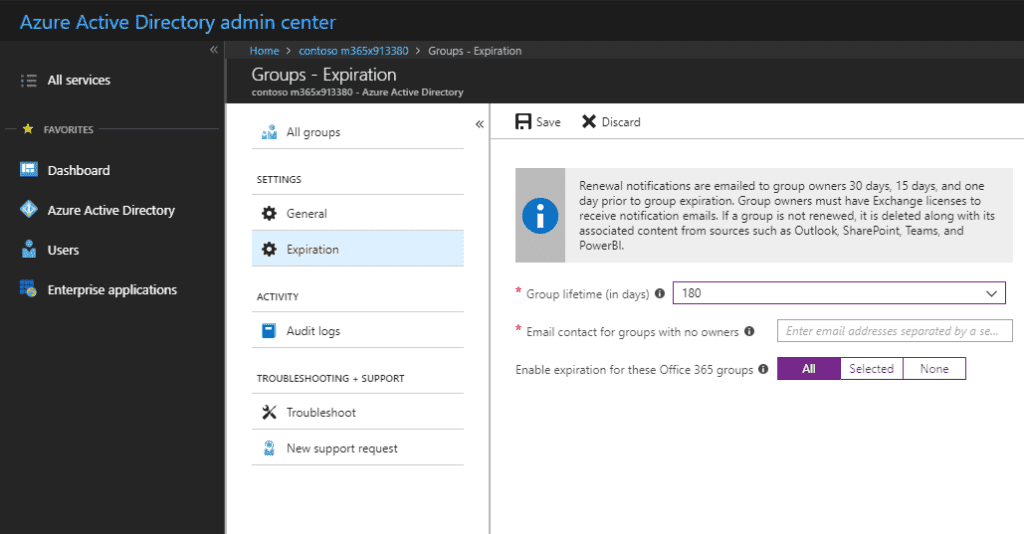
An expiration policy can help you to remove inactive groups and to make things clearer and easier to use. Admins can specify an expiration period, and any Group that reaches the end of that period, and is not renewed, will be deleted. The expiration period begins on the date the Group was created or last renewed.
Group owners will be sent an email before the expiration, giving them enough time to renew the Group for another expiration interval. On the negative side, you must have a Premium Azure AD license for all the members of the Groups to which the expiration policy is applied.
3. Deal with obsolete Office 365 Groups
There’s no out-of-the-box SharePoint solution to find out which Office 365 Groups are used in a certain period, and which aren’t. Yes, you can use good old PowerShell, but not all of us are fluent in that magical language.
Luckily, there is a simpler solution. You can use our tool, Syskit Point, to check from a single screen whether or not a Group has been used in the last three months. The Group’s activity is based on the Exchange conversation, SharePoint files, and Yammer messages. The tool has a 21-day free trial, so you can check if it suits you before you spend any money.
Once you detect your inactive groups, you have to decide what you should do with them. You can do two things – archive or delete them.
- Archiving groups: this is the state in which Groups and their information continue to be available, but can not be accessed by users. If you don’t want to delete the information for reasons of company rules and compliance purposes, this is the way to go. However, to do so you need to roll up your sleeves and do some PowerShell coding.
- Deleting groups: a Group owner can delete an inactive group. It’s worth noting that when you delete a Group, you are permanently removing everything related to that Group, including conversations, files, the Group notebook, and Planner tasks. Check the step-by-step deleting process.
That’s it. These are our suggestions for Office 365 Groups governance rules. Check out our in-depth webinar, If you want to learn more about Microsoft 365 group lifecycle management: